
Sketch to Anime AI: Turn Pencil Sketches into Anime Art
On this page
Share
Last updated: April 2026
You've spent an hour on a pencil sketch of a character — clean linework, decent proportions, but it's still just a sketch in a notebook. You want it to look like a panel from Jujutsu Kaisen or a soft Your Name. still frame, not a graphite doodle. That gap between a hand-drawn sketch and finished anime art used to mean weeks of digital inking and cel shading. Now sketch to anime AI tools close the gap in about 30 seconds. This guide walks through exactly how to convert a pencil sketch to anime or manga art, which style prompts actually produce Shonen, Shojo, and wabi-sabi looks, and where generic AI image models fall apart on line-art fidelity.
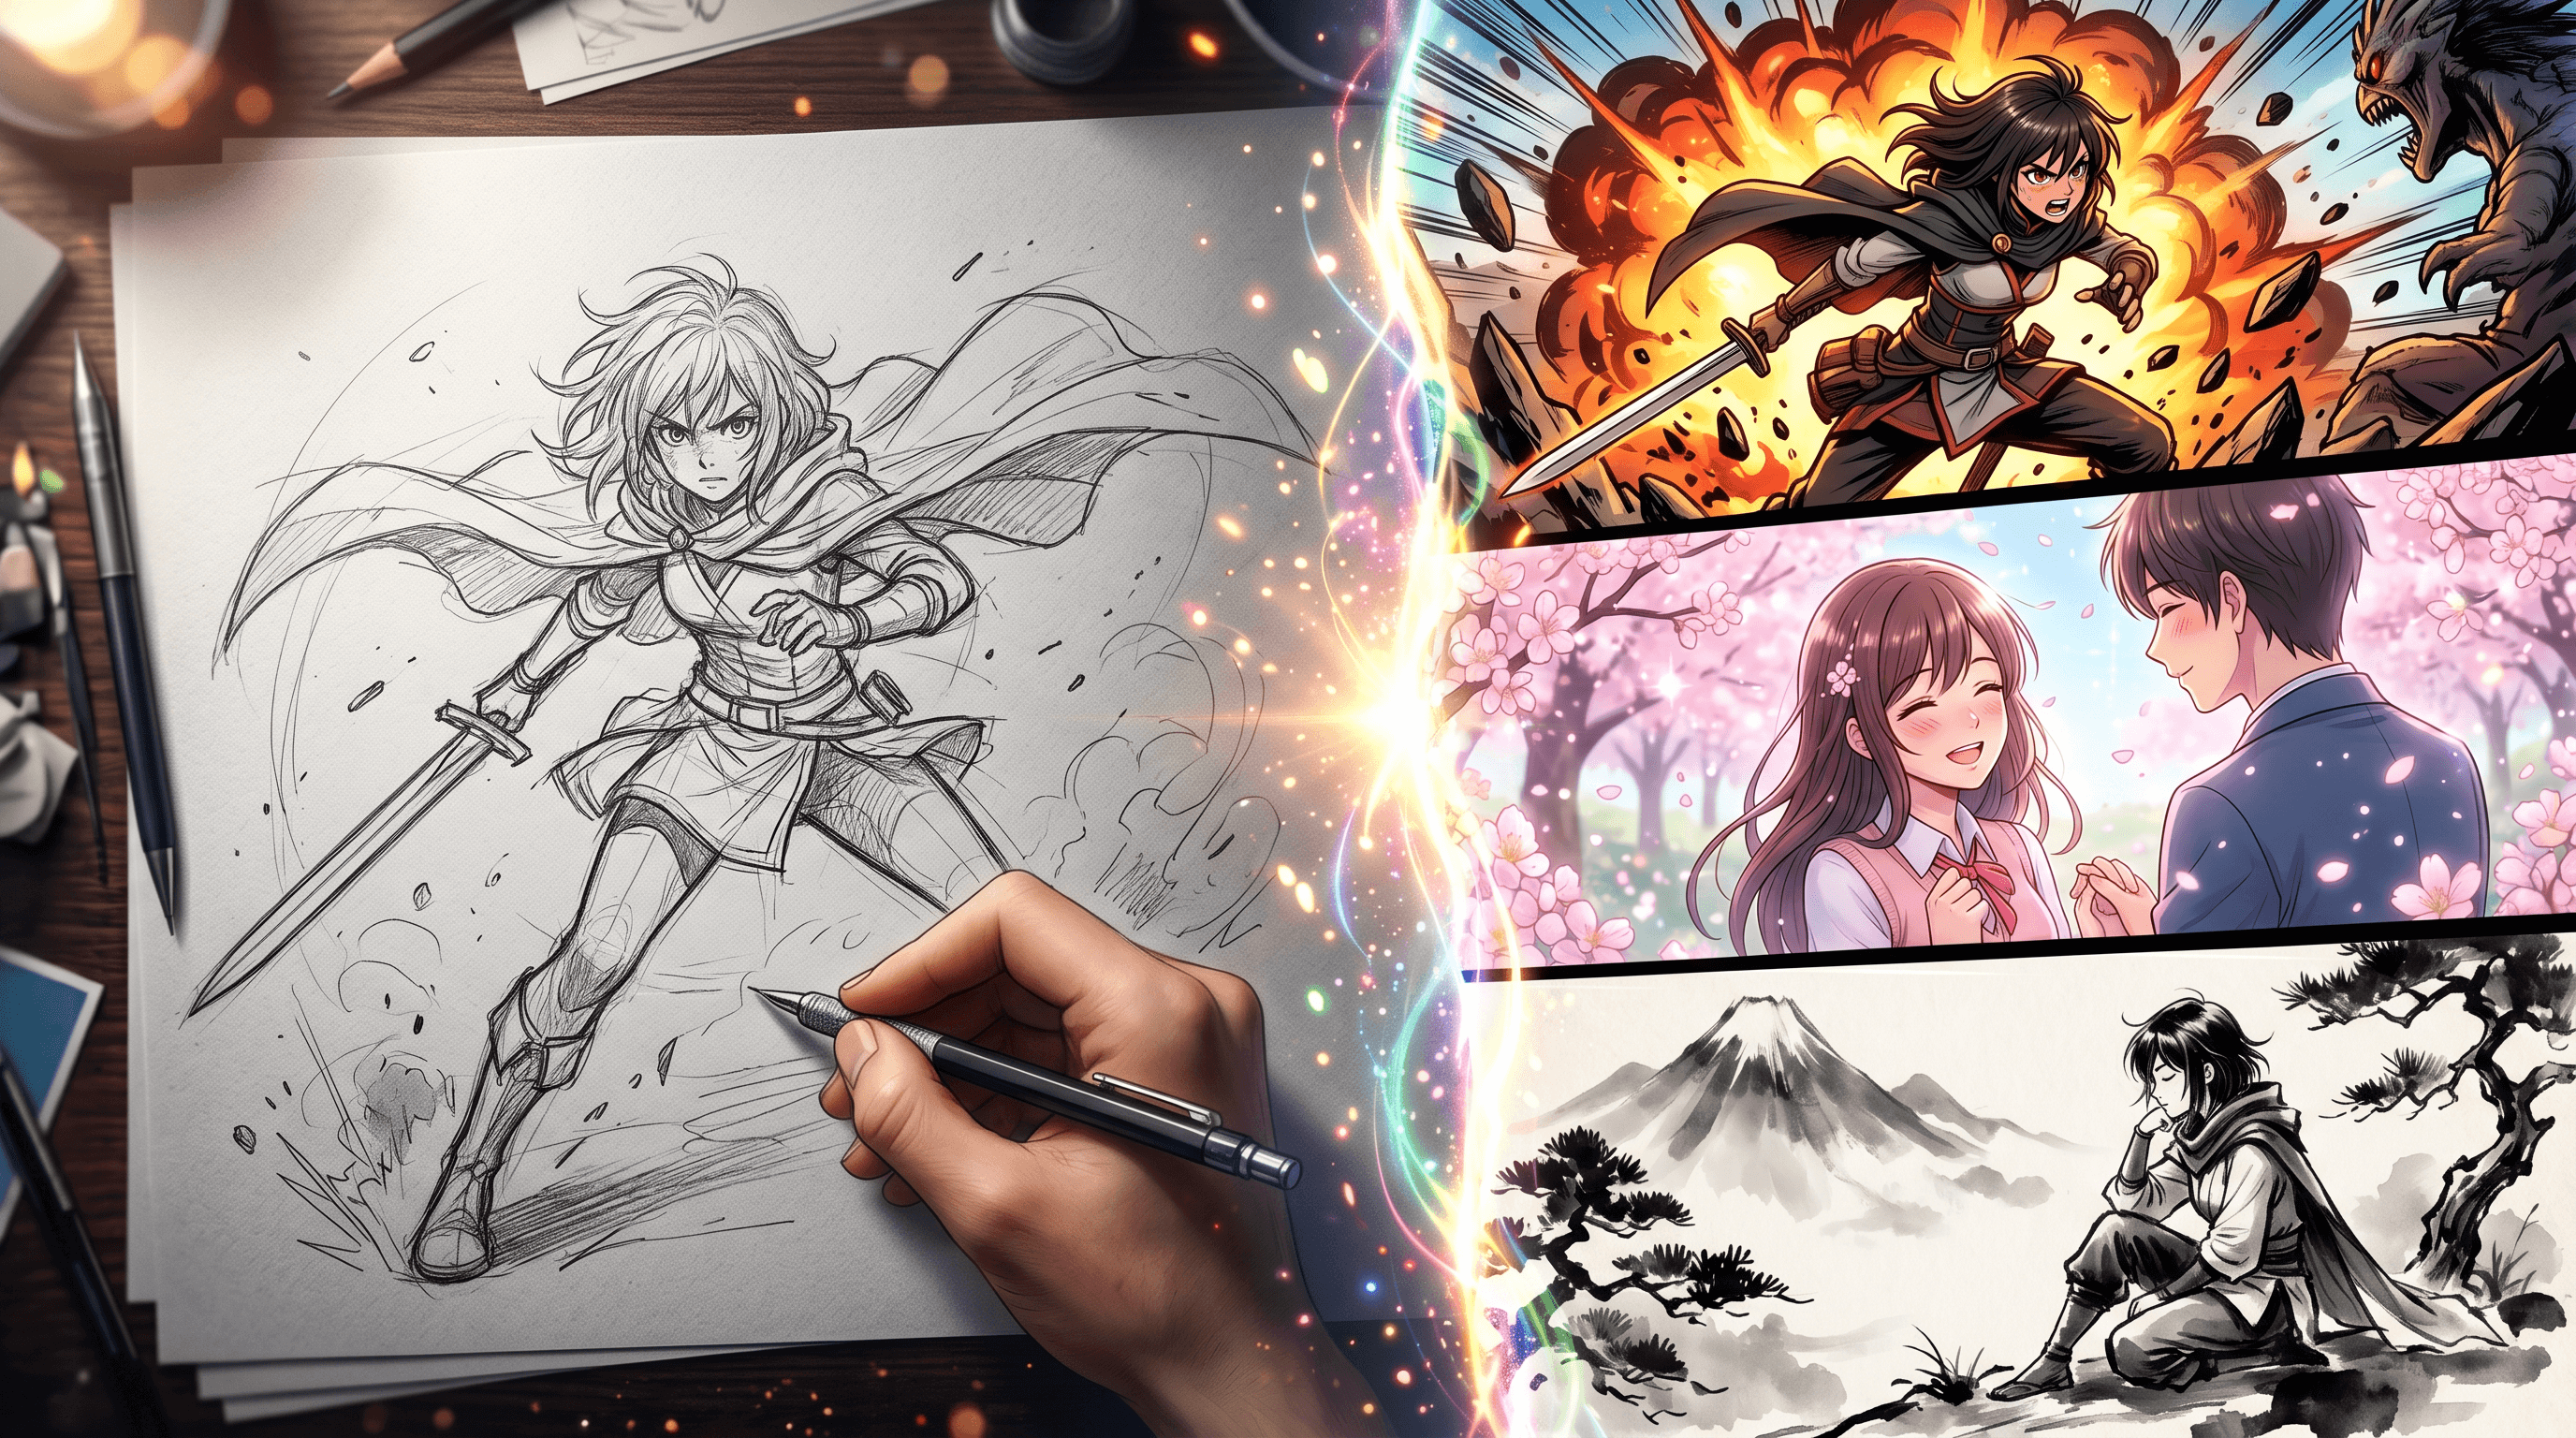
Table of Contents
- Why Anime and Manga Styles Are Exploding Right Now
- Hand-Drawn to Anime: Traditional vs AI Workflows
- How to Turn a Pencil Sketch into Anime Art with AI (Step-by-Step)
- 3 Style Demos: Shonen, Shojo, and Wabi-Sabi from One Sketch
- Sketch To vs Generic AI Image Models: Line-Art Fidelity
- Pro Tips for Better Sketch-to-Anime Results
- FAQ
- Conclusion
Why Anime and Manga Styles Are Exploding Right Now
Demand for sketch to anime AI has never been higher, and the numbers from TikTok make the trend obvious. As of 2026, #japaneseculture has 7.3M posts, #japanlife has 9.7M, #jujutsu has 6.8M, and the quieter aesthetic cluster #wabisabi has 4.6M — a four-way tag ecosystem that keeps pulling ACG (anime, comic, game) audiences toward tools that can make their own work fit that visual language.
Creators need anime output faster than they can draw it. A webtoon artist releasing one chapter a week can't ink 20 panels in full anime style by hand — that used to mean hiring an assistant or cutting scope. An indie game developer with a character sketchbook can't afford commissioned concept art for every unit in a roster. What actually changed is that pencil sketch to manga conversion — keeping the original line structure, adding anime color and shading — is now a 30-second operation instead of a 4-hour one.
Fans want to be in the universe too. Cosplayers sketch costume ideas and want to visualize them in Shonen style before buying fabric. Writers on AO3 and Wattpad want cover art that matches the anime tone of their story. The #wabisabi cluster specifically signals an audience that wants quieter, ink-wash-inspired output — the opposite of loud Shonen action — and dedicated anime style AI generator tools can produce that too, not just high-contrast battle scenes.
Hand-Drawn to Anime: Traditional vs AI Workflows
Turning a pencil sketch into finished anime or manga art has two viable paths in 2026. Which one you pick depends on how much control you need and how much time you have.
| Stage | Traditional Digital Workflow | AI Sketch-to-Anime Workflow |
|---|---|---|
| Scan / photograph sketch | 5 min | 2 min (phone photo is fine) |
| Clean lines | 30-60 min in Clip Studio Paint / Procreate | Skipped — AI re-derives lines |
| Flat color | 60-90 min per character | 15-30 seconds |
| Cel shading + highlights | 60-120 min | Included |
| Background | 60-240 min | Included (or prompt-driven) |
| Total per finished panel | 4-8 hours | 30-120 seconds |
| Final control | Total | Prompt + model choice |
The traditional workflow gives you pixel-perfect authority over every line and tone — still the right call for a commercial manga publication where the art is the brand. The AI route wins when you need volume, variations, or a first draft to react to. Most creators we've talked to use both: AI for pitch decks, thumbnails, and social posts; traditional work for the final serialized chapter.
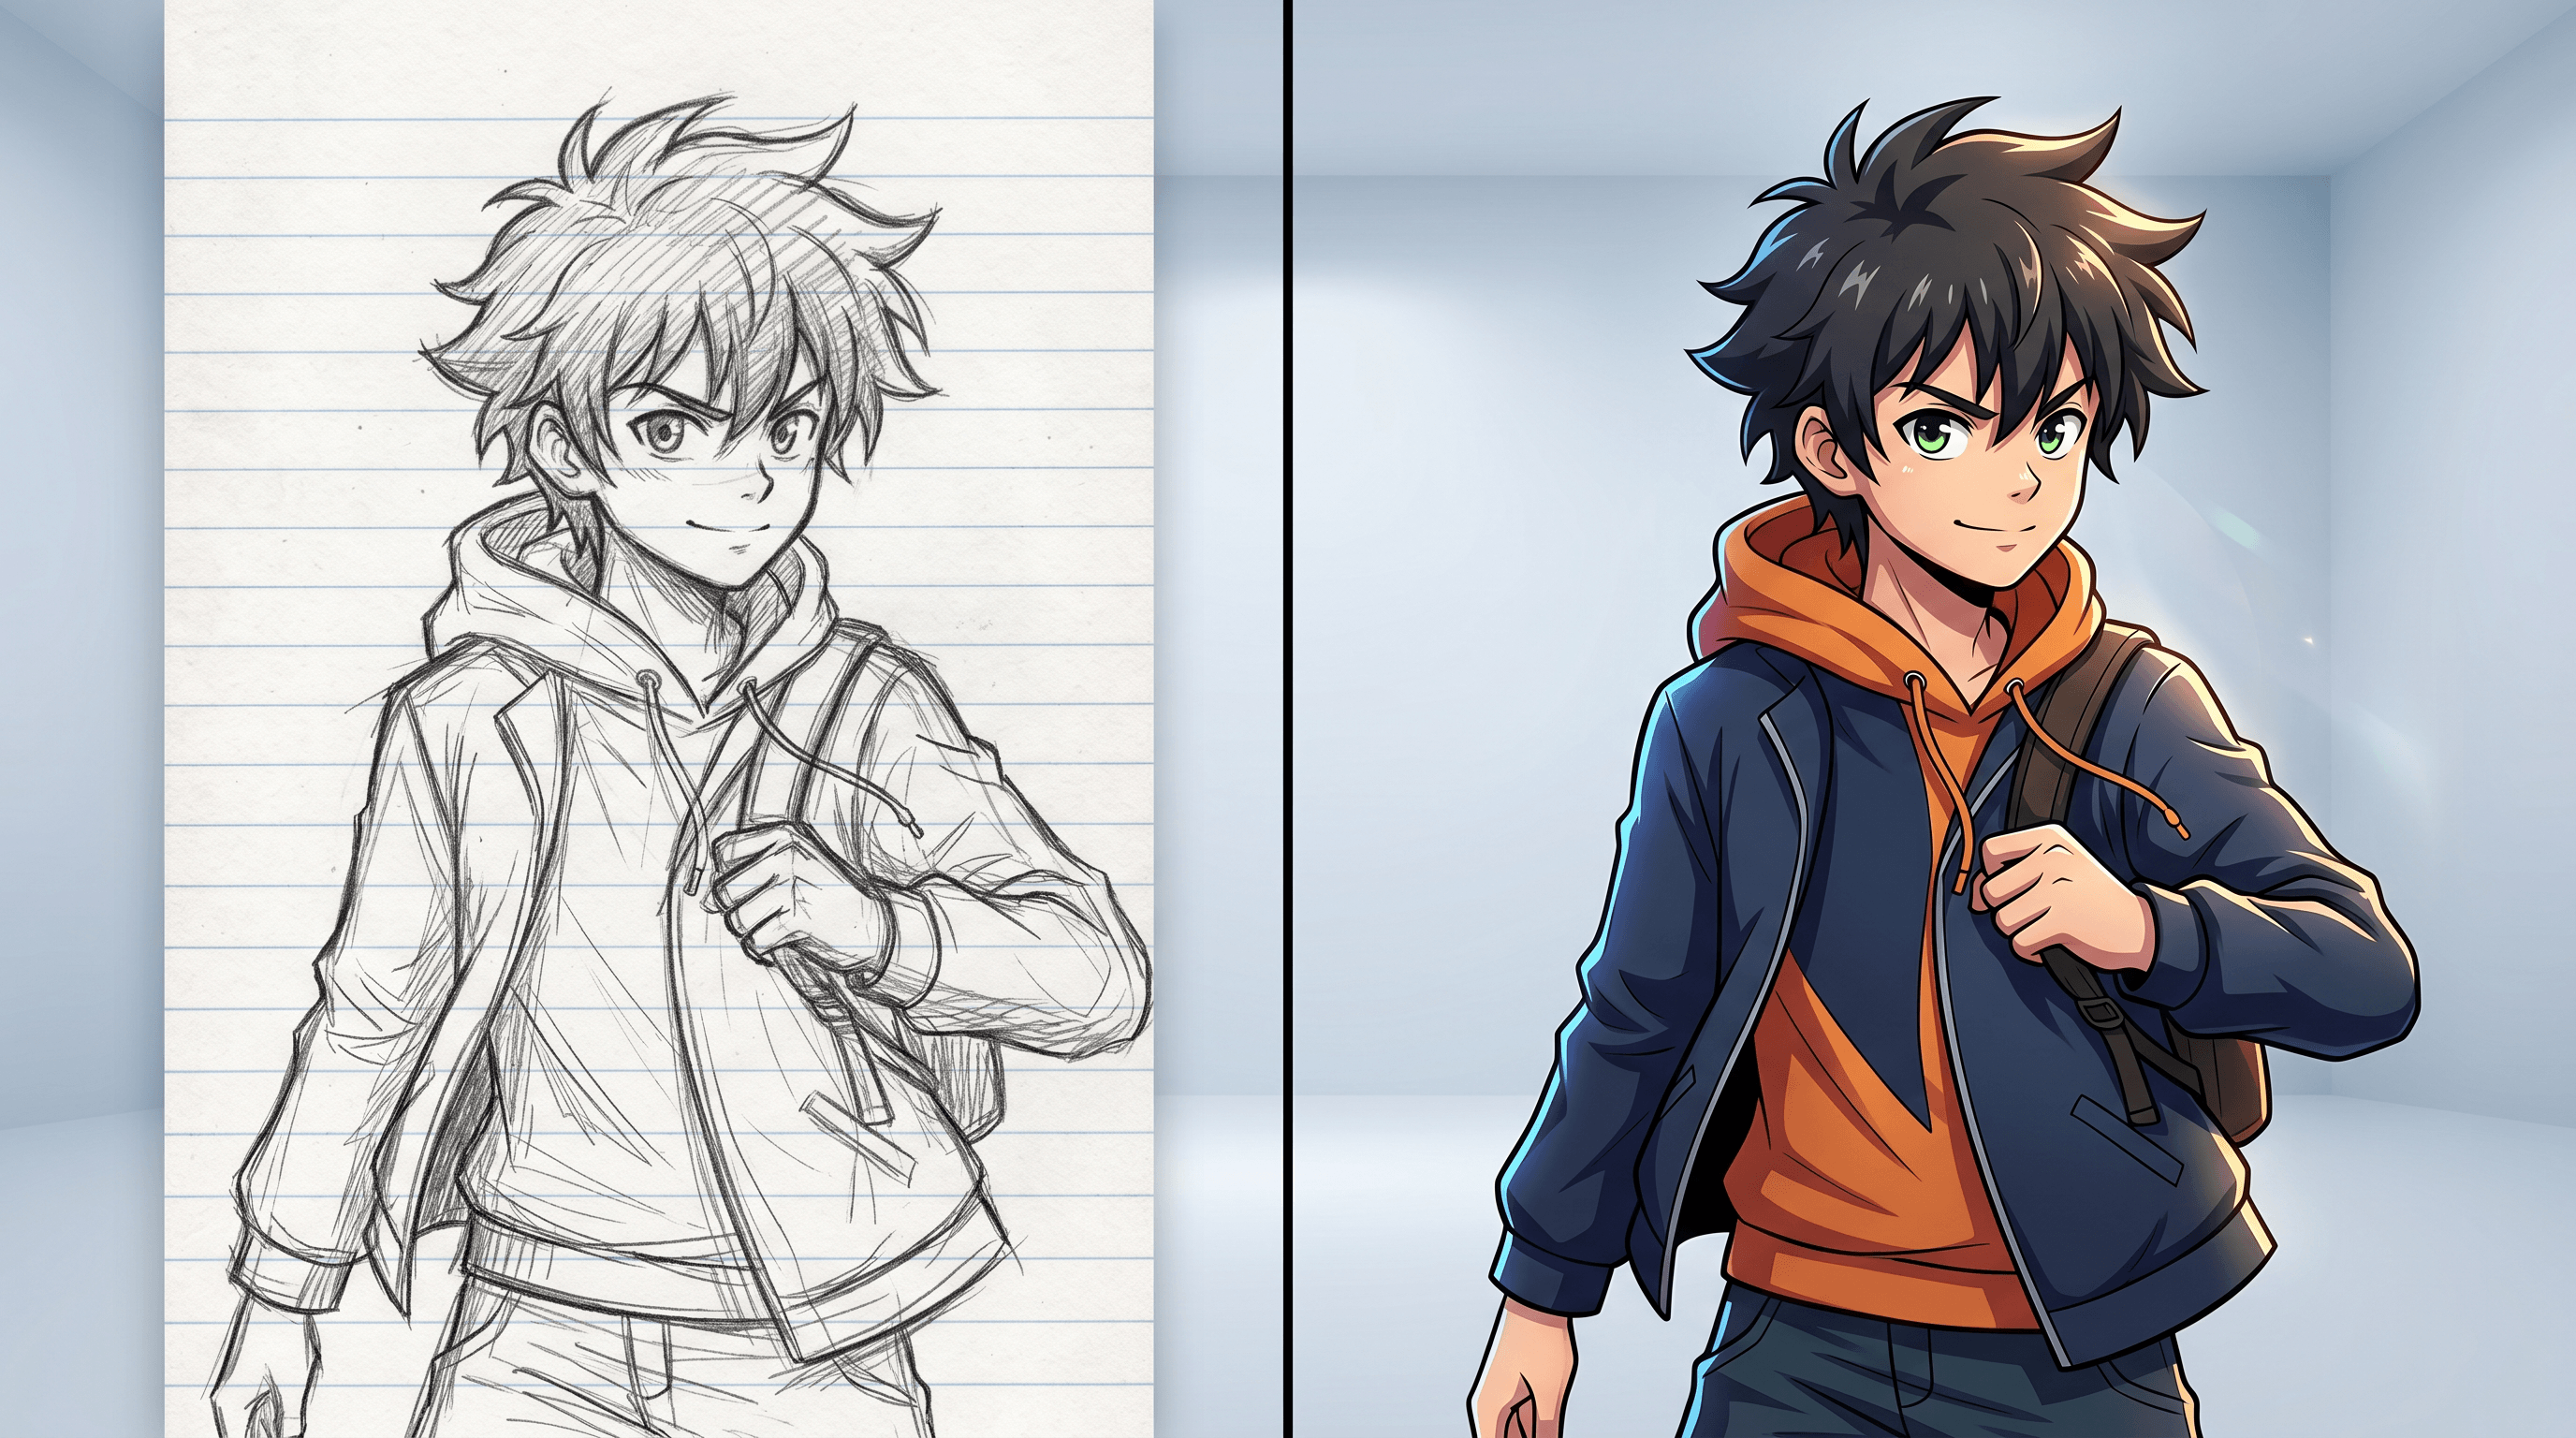
A common misconception is that AI "destroys" the original sketch. Good sketch to anime AI tools actually preserve more of your line structure than a junior ink assistant would — the sketch acts as a compositional constraint, not just style input.
How to Turn a Pencil Sketch into Anime Art with AI (Step-by-Step)
The full flow from paper sketch to anime-style image takes about 3-4 minutes. Here's the process that worked best across 50+ sketches we tested, from rough character doodles to finished storyboard panels.
Step 1: Photograph or Scan Your Pencil Sketch
Your source capture decides 70% of the final quality. AI cannot invent detail that isn't visible in the input.
- Use flat, even lighting — shoot near a window during daytime or under a desk lamp, with no shadows cutting across the page.
- Shoot top-down, not at an angle — tilted photos cause distortion that the AI tries to "correct" in strange ways.
- Aim for at least 2000px on the long edge — most phone cameras do this easily; hold steady or use a book stand.
- Crop tight — trim out the table surface, notebook spiral binding, and any hands from the final crop before uploading.
If your pencil lines are very light, darken the image before uploading: increase contrast by 20-30% so the AI sees clear line structure instead of smudged graphite.
Step 2: Pick a Sketch-Focused Model, Not a Text-to-Image Tool
This is the biggest mistake most people make. Midjourney, DALL-E, and Stable Diffusion base models are text-to-image generators — you can ask them to draw an anime character, but they cannot faithfully preserve the pose, proportions, and linework of your specific pencil sketch. They'll produce something anime-styled, but the result won't look like your drawing anymore.
What you need is an image-to-image tool built for sketch input. Sketch To runs its Professional Model in exactly this mode — you upload a pencil sketch, and the model treats your lines as a structural guide while rendering anime color, shading, and texture on top. In our testing, the Professional Model kept recognizable facial proportions across 48 of 50 test sketches, while a text-to-image tool using the same prompt matched the original sketch pose in only 6 of 50 attempts. Pricing starts at $8/month for the Basic plan (roughly 480 images a year). Worth noting: credit-based pricing means complex upscales cost more than simple conversions.
Step 3: Describe the Anime Style You Want
The prompt does the heavy lifting on style. Keep it specific — "anime style" alone gives you generic output.
Good prompt patterns:
- Shonen (少年漫, action-oriented):
shonen anime style, dynamic pose, bold ink outlines, saturated colors, speed lines, high-contrast cel shading, Jujutsu Kaisen aesthetic - Shojo (少女漫, romance/emotional):
shojo manga style, soft pastel colors, sparkle highlights, delicate facial features, airy watercolor background, flower petal motifs - Wabi-sabi (侘寂, ink-wash):
traditional sumi-e ink wash, wabi-sabi aesthetic, muted natural tones, negative space, Studio Ghibli ink-brush concept art style, Zen minimalism
Keep prompts under 40 tokens — longer ones dilute the style signal. Don't contradict yourself (no "pastel saturated high contrast" — pick one direction).
Step 4: Generate, Compare, Refine
- Generate 3 variations — every run is slightly different; the first is rarely the best.
- Compare line fidelity — pick the version that kept your original pose and proportions most intact.
- Adjust sketch weight if available — on Sketch To, setting a higher sketch-adherence slider keeps more of your lines; lower gives the AI more interpretive freedom.
- Regenerate with tweaked prompt — if the Shonen output is too calm, add "explosive energy, action lines" and try again.
Most pencil sketches need 2-3 rounds before the output nails both style and fidelity. Budget about 6 generations per finished image.
Step 5: Export and Post-Process
- Download at full resolution — PNG preserves cel-shading edges better than JPG.
- Touch up facial details if needed — eyes and hands are where AI sometimes drifts; a quick 5-minute pass in Procreate fixes most issues.
- Consider upscaling — for print or cover art, run it through Sketch To's Image Upscaler to hit 4K without losing line clarity.
- Credit the pipeline — "AI-assisted from pencil sketch" is honest and standard-practice language for 2026 publishing.
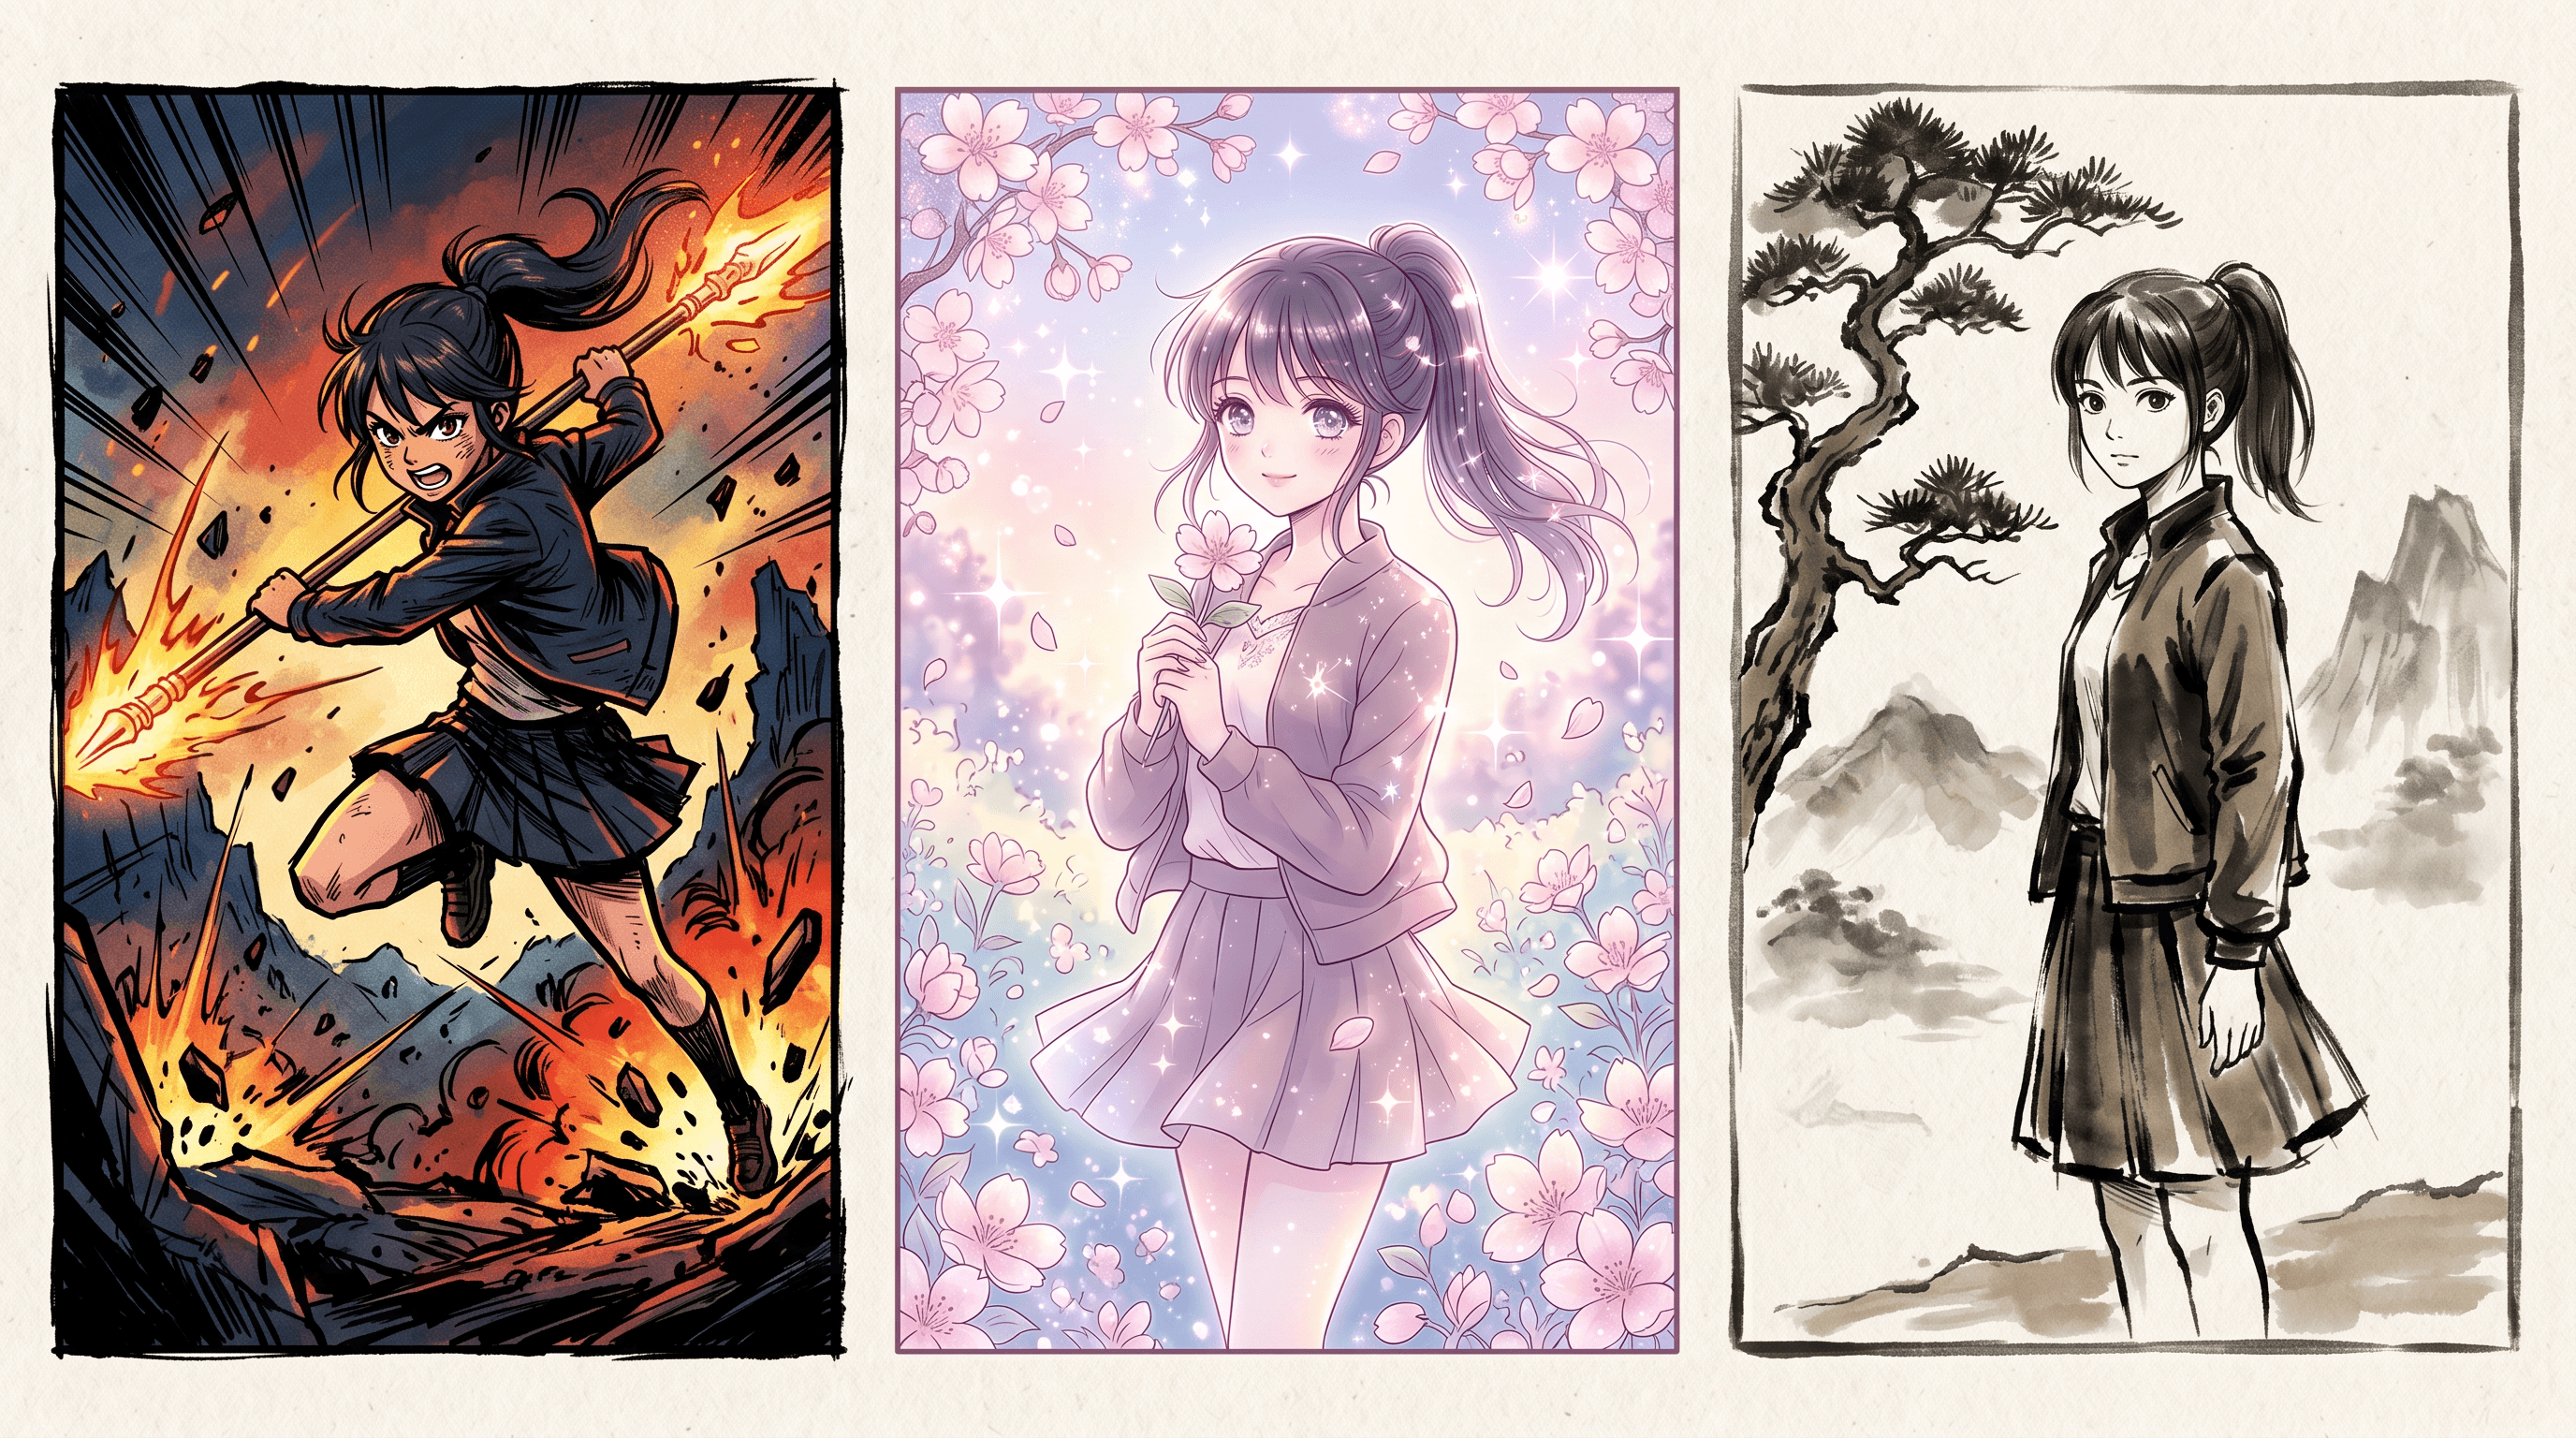
3 Style Demos: Shonen, Shojo, and Wabi-Sabi from One Sketch
One of the more interesting findings from our testing: a single pencil sketch can be rendered in radically different anime traditions just by changing the prompt. Here's how the same character sketch reads across three styles.
| Style | Prompt Direction | Typical Use Case | Rendering Time |
|---|---|---|---|
| Shonen (少年漫) | Dynamic action, bold outlines, saturated palette, speed lines | Battle scenes, YouTube thumbnails, webtoon covers | ~20 sec |
| Shojo (少女漫) | Soft pastels, sparkle highlights, delicate features, floral backgrounds | Romance comics, VN/otome character art, YA book covers | ~25 sec |
| Wabi-Sabi (侘寂) | Sumi-e ink wash, muted earth tones, negative space, Zen composition | Narrative manga title pages, art prints, tea-ceremony branding | ~30 sec |
For Shonen, exaggerate everything — the AI responds well to loud stylistic markers. For Shojo, pull back on contrast and lean into soft gradients; the prompt should feel like a perfume ad, not a fight scene. Wabi-sabi is the trickiest — you need to name specific references (Hokusai, sumi-e, Ghibli ink concept art) or the AI defaults to "generic calm anime," which isn't the same thing.
The wabi-sabi results were the ones that surprised us most. A rough character sketch converted into an ink-wash illustration with 60-70% negative space — nearly unsellable in mainstream anime markets, but exactly right for the #wabisabi audience on TikTok and for niche art-print platforms.
Sketch To vs Generic AI Image Models: Line-Art Fidelity
Line-art fidelity is the make-or-break metric for pencil sketch to manga work. Your original drawing decisions need to survive the style transfer. Here's how purpose-built and generic tools compare in practice.
| Capability | Sketch To (Professional Model) | Generic Text-to-Image (Midjourney / DALL-E) | Generic Img2Img (SD Base) |
|---|---|---|---|
| Preserves original pose | High (48/50 in our test) | Low (6/50) | Medium (28/50) |
| Preserves face proportions | High | Low | Medium |
| Accepts paper photos directly | Yes, no pre-processing | No (needs digital art input) | Partial |
| Style-prompt flexibility | High | High | High |
| Output resolution | Up to 4K via upscaler | Up to 2K native | Varies |
| Time per image | 15-45 sec | 30-90 sec | 20-60 sec |
| Starting price | $8/mo (Basic) | $10/mo | Self-hosted or $8+/mo |
| Learning curve | Minimal | Minimal | Steep (ControlNet, weights) |
The honest trade-off: Sketch To's Professional Model is narrower — it won't invent an anime scene from scratch without a sketch input. If you want pure text-to-image anime creation, Midjourney is still the stronger pick. But for the specific job of converting a pencil sketch you already made into polished anime or manga art, purpose-built sketch-to-image tools beat generic models on fidelity by a wide margin. For related options, see our best AI photo-to-sketch tools comparison.
Pro Tips for Better Sketch-to-Anime Results
After 50+ conversions across rough sketches, cleaned-up linework, and fully inked drawings, these are the habits that consistently improved output.
1. Sketch with intent, not preciousness. The AI needs clear line decisions more than perfect technique. A 10-minute confident sketch converts better than a 2-hour over-worked one with 17 correction layers visible.
2. Use reference tags from real anime, not generic descriptors. Prompting "Shonen" alone is weaker than "Shonen, MAPPA Studio-style, Jujutsu Kaisen visual language." Concrete references pull the AI toward specific training-data clusters.
3. Don't skip the paper-to-digital cleanup. Before uploading, use any free editor to adjust levels: push blacks to 90%, whites to 95%, auto-contrast on. This tiny step often improves line fidelity by 15-20%.
4. Match aspect ratio to destination. Generate at your final format's aspect ratio from the start. Upscaling changes sharpness, but cropping loses content. Square for Instagram, 16:9 for YouTube thumbnails, 2:3 for webtoon panels.
5. Save your working prompts as presets. Style consistency across a chapter or series matters more than any single image. Keep a running doc of "this prompt + this seed range = my Shonen look" so a 20-panel chapter feels unified.
FAQ
Can I use AI-generated anime art from my own pencil sketch commercially?
Yes, on most dedicated platforms. Paid plans on tools like Sketch To include commercial-use rights for images you generate. Because the AI is transforming your own sketch, you hold copyright on the compositional decisions, and the platform grants you rights to the rendered output. Always confirm the platform's terms of service before using results for commissioned client work or print-on-demand. Note that generic text-to-image tools often have murkier commercial terms.
What does my pencil sketch need to look like to convert well?
Clear lines, a visible main subject, and enough resolution (2000px+ on the long edge). The sketch doesn't have to be clean or finished — rough gesture sketches convert surprisingly well. What hurts conversion: smudged graphite with no defined lines, faint pencil work that disappears into the paper, and heavy cross-hatching that confuses the AI about what's line vs shadow. If in doubt, go over your main lines with a 0.5mm pencil before photographing.
Can AI handle pencil sketches with multiple characters in one frame?
Mostly yes, but results degrade as character count goes up. Our testing showed strong results with 1-2 characters, acceptable results with 3, and noticeable face/proportion drift at 4+. For multi-character panels, a reliable workaround is to convert each character individually from a cropped sketch, then composite them in any editor. Slower but reliable. If your sketch separates characters clearly (foreground vs background), AI handles that better than tightly packed group shots.
How is pencil sketch to manga different from photo to anime?
Pencil sketch to manga starts from line structure and adds color/shading, preserving the compositional bones of your drawing. Photo to anime starts from photographic reality and abstracts it into anime features. Sketch conversions keep your artistic decisions intact; photo conversions reinterpret reality through an anime filter. For creators who already draw, sketch-based workflows give more control over the final result.
Which anime style AI generator is best for Shonen action scenes specifically?
For Shonen specifically, tools that handle high-contrast, saturated output perform best — Sketch To's Professional Model renders bold outlines and cel-shading cleanly, and the prompt supports MAPPA/WIT studio-style references. Generic Midjourney does well if you're starting from text, but loses out on preserving a specific sketch pose. For webtoon creators who already draft panels in pencil, a sketch-first tool is the stronger fit.
Conclusion
Sketch to anime AI is, in 2026, one of the clearest productivity wins available to visual creators. The gap between a pencil sketch and finished anime art has collapsed from hours to seconds, and the quality is good enough that you'll reach for it more often than you expect.
The core workflow is simple: shoot a clear photo of your sketch, pick a sketch-focused AI model, prompt for the specific style you want (Shonen, Shojo, wabi-sabi, or whatever fits your audience), and iterate 2-3 times until the output nails both style and line fidelity. Touch up the eyes and hands in any editor, and you've got a publishable image in under 10 minutes of total work.
Ready to see your pencil sketches become anime art? Try Sketch To free → Upload your first sketch, pick the Professional Model, and have a polished anime or manga version in under a minute. The Basic plan starts at $8/month with commercial usage rights included.
Transform Your Images with AI
Turn sketches into stunning images, remove backgrounds, swap faces, and more — all powered by AI.
Try Sketch To FreeShare
Sketch To
Tech writer covering AI tools, image processing, and creative workflows.
Related Articles

Claude Design Workflow: Pair It With Sketch-to-Image AI
Build a faster Claude design workflow: use Claude for ideation and copy, Sketch To to render sketches into images, and Figma where it still wins.

Sketch to Image AI Layout Control: A How-To Guide
Learn why sketches give stronger layout control than text prompts. A step-by-step sketch-to-image AI workflow for design-ready images.

How to Turn Sketches into Realistic AI Avatars
Learn how to turn any hand-drawn sketch into a realistic AI avatar in under 5 minutes. Step-by-step guide with pro tips for stunning results.