How to Restore Old Photos With AI: Tested Prompts, Real Credit Costs
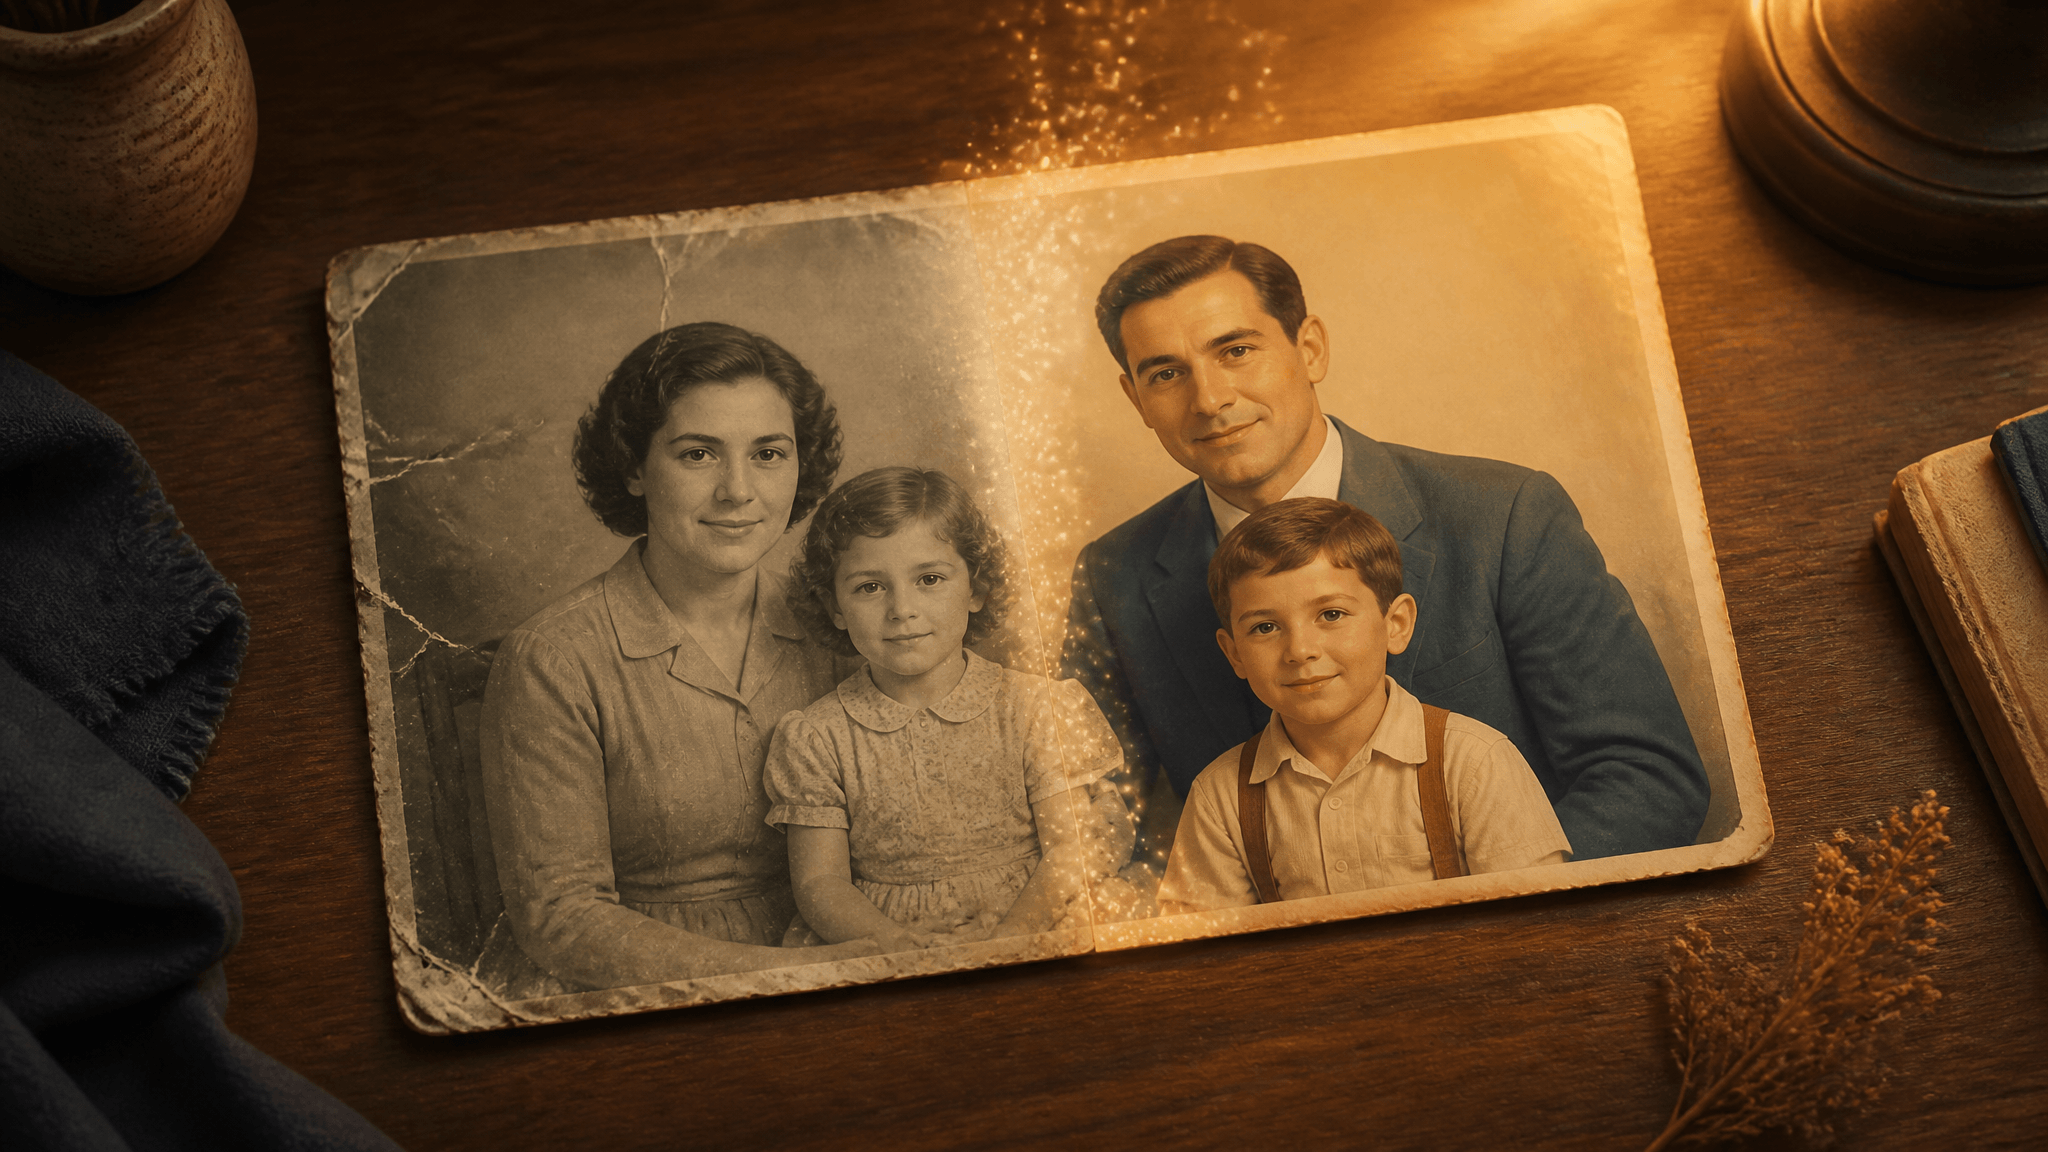
Most of us have a box of old family photos that time has not been kind to: white scratch lines, creases, foxing spots, and contrast that faded to gray. AI photo restoration can fix a surprising amount of that from a single scan — if you prompt it correctly.
We tested a complete restoration workflow on SketchTo using prompt-based editing on Nano Banana, one of the platform's editing models that accepts an uploaded photo. Three copy-paste prompts — repair, face-safe sharpening, and optional colorization — cost us 6 credits total (2 credits per run, roughly 50–80 seconds each), and the man in our test photo stayed recognizably himself through every step.
Full disclosure on that test photo: it is not a real relative. We generated a synthetic image of a fictional man and digitally added the classic damage — scratches, a crease, foxing, worn edges — to simulate a typical damaged scan. Real family photos are private, and a synthetic fixture keeps the test honest: every observation below is about what the prompts did, not whose photo it was.
The single most important lesson from testing: anchor the prompt to your photo. When we ran a generic "restore this old damaged photograph" prompt, the model twice invented its own before-and-after pair featuring a completely different person instead of editing our image. The templates below fix that with explicit anchoring language.
What AI restoration can and can't fix
Based on our runs, here is the realistic picture:
- Fixes well: surface scratches, dust and foxing spots, crease lines, worn edges, and flat, faded contrast.
- Mostly preserves: identity, expression, pose, and clothing — when the prompt explicitly forbids changing them. Our test subject's face, mustache, and suit survived all three steps.
- Does subtly: sharpening. Face-preserving sharpening is a small, safe nudge, not a miracle. If you expect a crisp modern portrait from a blurry 1970s snapshot, you will be disappointed.
- Won't do: recover detail that was never captured. Restoration cleans and rebalances what is in the scan; it does not reconstruct a sharp face from an out-of-focus original.
One honest caveat from our test: the repaired photo came back with a warm sepia cast instead of neutral black-and-white, and the framing came back slightly tighter than the original scan. Neither was a problem for us, but if you want strictly neutral tones, say so in the prompt.
Before you start
Scan the photo properly. A clean, flat, well-lit scan gives the model something worth restoring. Remove the photo from any album sleeve, wipe the scanner glass, and scan at your scanner's photo setting rather than photographing the print at an angle.
Sign in and check your credits. SketchTo works on credits: new accounts get 4 free credits valid for 365 days, and the editor shows the exact cost on the generate button before you click it. Every result lands in your History, where you can download it.
Know what you are asking for. Restoration is a distinct task on SketchTo:
- Image Upscaler enlarges and sharpens resolution — it cleans up pixels, not scratches.
- AI Vintage Portrait Generator does the opposite of restoration: it makes new photos look old.
- The editing models below repair and recolor an existing photo.
Pick a model
All of SketchTo's prompt-first editing models accept an uploaded photo. Credits are charged per generation, and prices as of our test date (September 23, 2026) are:
| Model | Credits per run | Notes |
|---|---|---|
| Nano Banana | 2 | Up to 3 reference images. This is what we tested. |
| Flux Kontext Pro | 2 | Single-image edits, budget option. |
| GPT Image 2 | 3 | Up to 8 reference images. |
| Qwen Image Edit | 3 | Requires an input image. |
| Nano Banana Pro | 8 | Up to 5 reference images, 4K output options. |
We ran the whole workflow on Nano Banana at 2 credits a run: restoration chains involve trial and error, and cheap runs keep experimentation affordable. If you want to follow along, open the Nano Banana editor, upload your scan, and paste the prompts below into the Custom Prompt box.
Step 1: Repair the damage
This is the core step, and the wording matters. Here is the exact template we tested:
The attached image is an old damaged black-and-white photograph of a mustached
man in a dark suit. Repair this exact photograph: remove all scratches, dust
specks, foxing spots and stains, fix the crease and worn edges, and recover the
faded contrast and tonal depth. Output only the repaired photograph itself -
same man, same pose, same framing, same composition, no side-by-side comparison.
Do not alter his face, identity, expression, age, clothing or pose. Keep it
black and white.
Why each part earns its place:
- "The attached image is..." anchors the model to your photo. This clause is what separates a restoration from an invented illustration.
- Name the damage you actually see — scratches, creases, foxing, fading — so the model does not guess.
- "Output only the repaired photograph itself... no side-by-side comparison" prevents the model from spending half its canvas on a before/after diptych.
- The preservation clause ("do not alter his face, identity, expression, age, clothing or pose") is your likeness insurance.
- Describe the person (mustached man, dark suit) so the anchoring is concrete. Swap in your own description — a child in a christening gown, a couple in wedding clothes.
Adapt the description to your photo and keep everything else. The result on our damaged test scan: all scratch lines, the crease, and the foxing disappeared, edges cleaned up, and contrast came back — with the man's face and clothing intact.
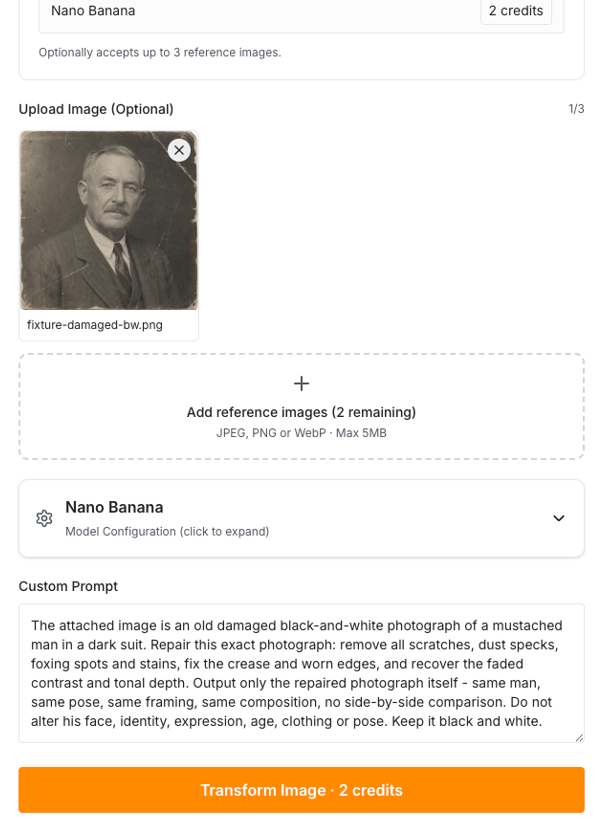
The tested setup on sketchto.com's Nano Banana editor (screenshot, September 23, 2026); the cost shows before you generate.
Our synthetic test photo (left) and the repaired output (right) from our run — note the subtle sepia shift:
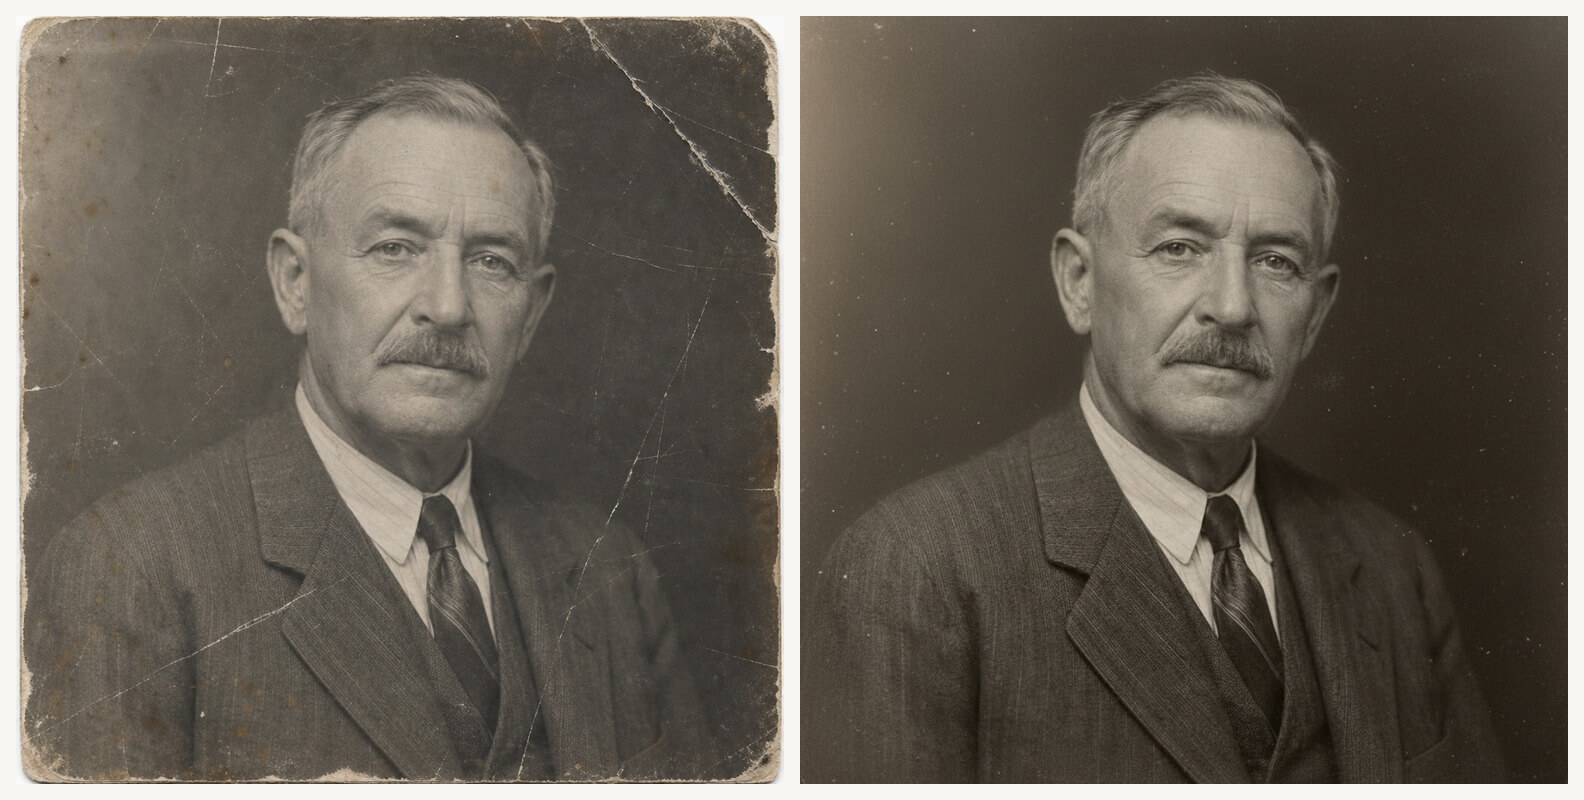
Left: our synthetic test input (fictional man, damage added digitally). Right: the actual Nano Banana output from the tested repair prompt, one run, 2 credits.
Step 2: Sharpen the face (optional)
If the repaired photo still looks soft, this prompt nudges facial detail without repainting the person:
The attached photograph is a restored black-and-white portrait of an elderly
mustached man. Enhance the fine detail of his face - eyes, eyebrows, mustache,
skin texture - and the overall sharpness of the photo. Keep his identity,
expression, age, pose, framing, clothing, and background exactly the same.
Do not smooth, beautify, or rejuvenate his face. Do not add color and do not
change the sepia tone.
Our result was deliberately modest: slightly crisper eyes and mustache definition, everything else untouched. That is what a safe sharpening pass should look like. The "do not smooth, beautify, or rejuvenate" clause matters most here — without it, models tend to sand away the wrinkles that make your relative look like themselves.
Upload the repaired photo from Step 1 (download it from History first), not the original scan, so damage repair and sharpening do not fight each other.
Step 3: Colorize (optional)
Colorization is a taste decision, not a necessity. If you want it, describe plausible colors rather than asking for "color" and hoping:
Colorize this black-and-white studio portrait with natural, historically
plausible colors for a 1940s photograph: realistic older skin tones, gray hair
and mustache kept gray, a charcoal wool suit, a light striped dress shirt, and
a muted dark tie, with a neutral dark gray studio backdrop. Keep the man's
identity, expression, age, pose, framing, clothing style, and lighting exactly
the same. Do not restyle, beautify, or change the composition. Keep the colors
muted and realistic - no vivid saturation.
Naming the era ("1940s photograph") and the palette you expect (gray hair, charcoal suit, muted colors) keeps the result believable. Our colorized output kept the gray mustache gray and produced a sensible charcoal-and-cream palette with no neon drift.
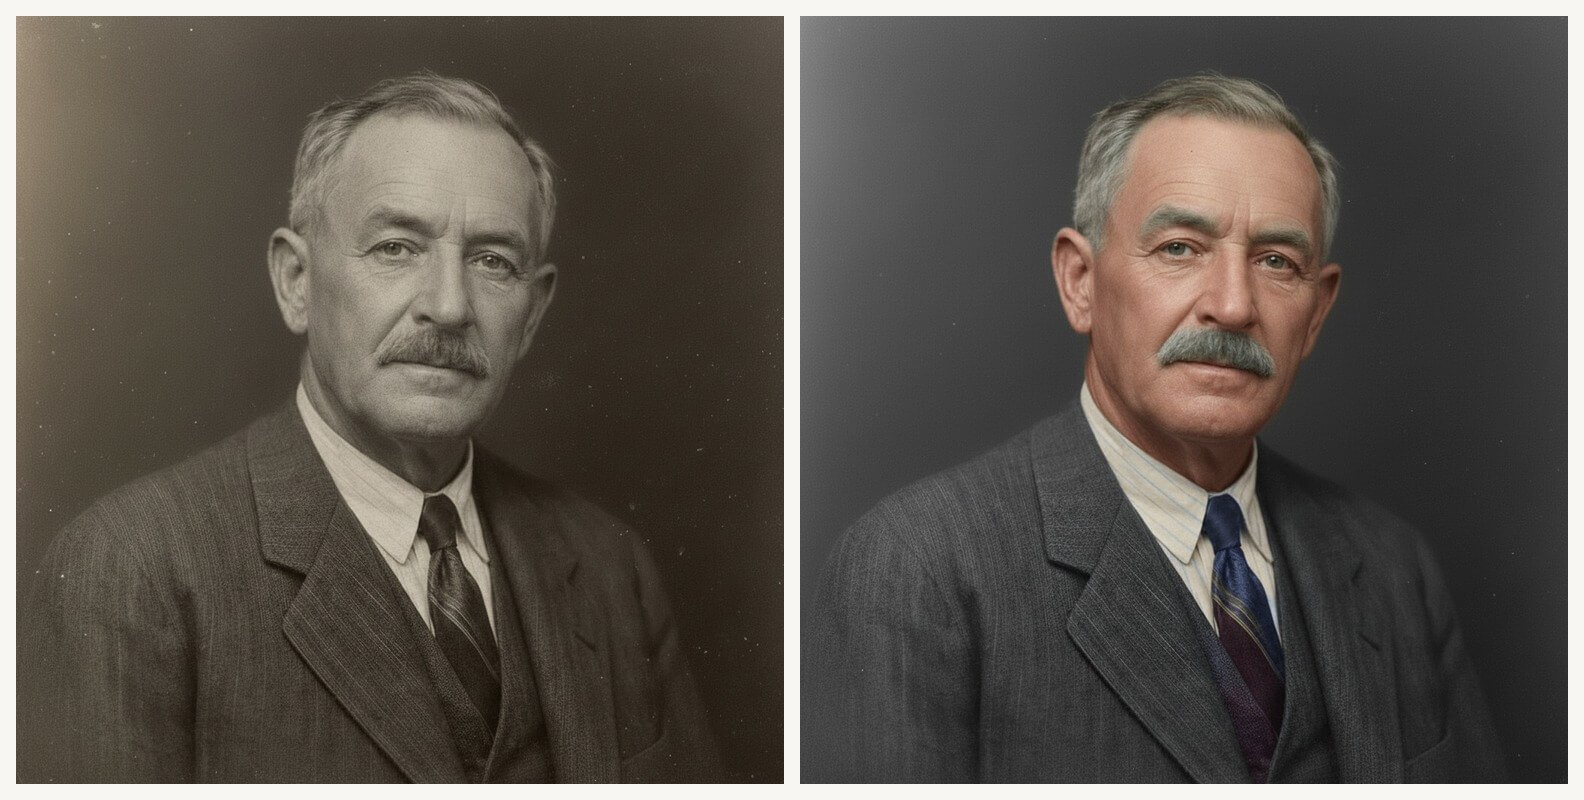
Left: sharpened black-and-white photo. Right: actual colorized output from the tested prompt (one run, 2 credits) — gray hair kept gray, muted palette.
The sharpened black-and-white photo (left) and the colorized result (right).
What our tests cost
Three successful runs on Nano Banana, one per prompt, chained from each output:
| Step | Result | Credits | Wall time |
|---|---|---|---|
| Repair | Usable | 2 | ~74 s |
| Sharpen | Usable | 2 | ~48 s |
| Colorize | Usable | 2 | ~80 s |
| Total | 6 |
The 4 free credits on a new account cover repair plus sharpening exactly; colorizing your first photo takes one more credit than the free tier allows. Failed generations were not charged during our tests — we had four failures (provider errors on a flaky morning) and every one was refunded automatically.
Two honest lessons from our failed runs
An unanchored prompt can invent a person. Before landing on the template above, we ran a generic "Restore this old damaged photograph..." prompt twice on Nano Banana Pro (8 credits each). Both runs completed, and both returned a beautifully restored photo — of a man who was not in our photo. The model had composed its own damaged-and-restored diptych from the text alone. That experience is why the template starts with "The attached image is..." and ends with "no side-by-side comparison." Always check the output actually shows your relative before you close the tab.
Provider hiccups happen, and you should not pay for them. On the same morning, four runs across different models failed with errors like "generate task timeout" and "Internal Error." None was charged. If a run fails on SketchTo, check your balance before retrying — and if a completed output ignored your upload, that is your cue to add the anchoring language.
FAQ
Will AI restoration change how my relative looks? It can, if you let it. Our experience matches the obvious precaution: keep the preservation clauses in the templates, and compare the output with the original at full size before you accept it.
Is it free? New SketchTo accounts get 4 free credits, and each Nano Banana restoration run costs 2, so your first repair-and-sharpen chain is free. Beyond that, credits come from the pricing plans.
What if the original is severely damaged — torn, water-stained, or missing pieces? The repair prompt handles surface damage and fading well, but large missing areas ask the model to invent content, and invented faces are how you lose a likeness. Treat heavily damaged originals as repair-with-low-expectations, and keep the original scan as the source of truth.
Can I use restored photos commercially? SketchTo's Basic plan covers personal use; commercial use requires the Pro tier per the platform's plan terms.
The bottom line
Restoring old photos with AI is a three-step chain — repair the damage, sharpen the face, optionally colorize — and each step is a prompt you can copy, adapt, and rerun for 2 credits a step on Nano Banana. Keep the anchoring language, keep the preservation clauses, and judge every output against the original scan. The person in the photo is the whole point; the technology works best when it is asked to stay out of their face.
Transform Your Images with AI
Turn sketches into stunning images, remove backgrounds, swap faces, and more — all powered by AI.
Try Sketch To FreeShare
SketchTo Team
Tech writer covering AI tools, image processing, and creative workflows.
Related Articles
How to Turn a Photo into a Perler Bead Pattern (Free Beginner Tutorial)
A tested beginner walkthrough: turn a photo into a printable perler bead pattern with a free online tool, read and print the grid, match bead sizes and color codes, and fuse both sides following official ironing methods.
How to Create the 80s AI Photo Look: Tested Steps + Copy-Paste Prompts
Turn a photo into an authentic 80s portrait: a tested step-by-step workflow, all 9 era themes explained, 5 copy-paste prompts, and tips for a convincing result.
Image to Prompt with DeepSeek V4.1-Flash: A Beginner's Guide
DeepSeek V4.1-Flash reads images natively. Learn the documented API workflow to turn any image into a reusable AI image prompt — real prices, real limits, and a template to adapt.